SvelteKit with Auth0 integration

Auth0 excels at offering pre-made libraries for web applications. The Next.js template simplifies the process significantly, requiring only an npm install, configuration of environment variables, creation of a route for the auth endpoints, and finally, crafting components for managing login/logout buttons. Getting up and running is incredibly fast, sparing engineers from delving deeply into the nuances of how OAuth works.

When it comes to integrating with new frameworks like SvelteKit, many of us (myself included) anticipate a similar experience. However, the convenience of these libraries has led to a loss of basic understanding of OAuth flows along the way. Why not take just 10 minutes to learn and implement it yourself? It’s not as difficult as it seems!

Authorization code flow

For web applications with a backend server, you’ll want to use the Authorization Code Flow, and implementing it in SvelteKit is straightforward. At the end of the flow, we issue a session cookie to the user and validate it on every request to our protected routes. Here’s a diagram of the basic flow:

We need two endpoints for this flow: the initial authentication request from the user (for example, clicking a login link or requesting a protected page) and a callback endpoint for verifying the authorization code from Auth0. Similar to Next.js, we can leverage API endpoints to achieve this.

Login

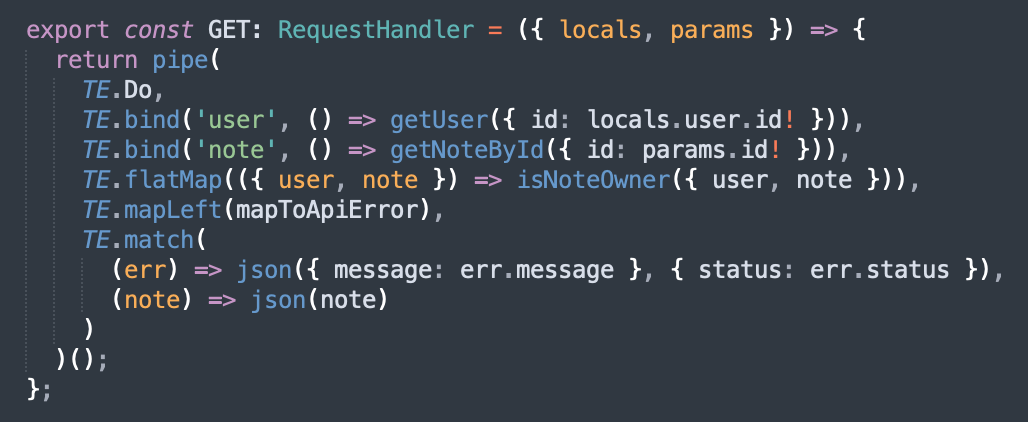
Starting with the login let’s deep dive in to the GET request. You can create this file under /routes/api/auth/login/+server.ts

import type { RequestHandler } from '@sveltejs/kit';
import { AUTH0_DOMAIN, AUTH0_CLIENT_ID } from '$env/static/private';
import { PUBLIC_BASE_URL } from '$env/static/public';

export const GET: RequestHandler = ({ cookies, url }) => {
const csrfState = Math.random().toString(36).substring(7);
cookies.set('csrfState', csrfState, {
httpOnly: true,
sameSite: 'lax',
maxAge: 1000,
path: '/'
});

const returnUrl = encodeURIComponent(url.searchParams.get('returnUrl') || '/');

const query = {
scope: 'openid profile email',
response_type: 'code',
client_id: AUTH0_CLIENT_ID,
redirect_uri: `${PUBLIC_BASE_URL}/api/auth/callback?returnUrl=${returnUrl}`,
state: csrfState
};

return new Response(null, {
status: 302,
headers: {
location: `https://${AUTH0_DOMAIN}/authorize?${new URLSearchParams(query).toString()}`
}
});
};

This process is quite straightforward. We generate a random string to store in a cookie for the user. Using a cookie to provide the CSRF token to the client prevents successful attacks because the attacker cannot read the cookie value, which is required for server-side CSRF validation.

The code then creates a redirect URL to the Authorization server, passing additional parameters like the scopes required. In this snippet, we request the openid, profile, and email scopes. The return URL is also an important factor; the snippet redirects the user to the homepage by default unless a query parameter is passed. Another good option would be to redirect the user to the HTTP referrer of the incoming request.

Callback

Next up is the callback. I used the endpoint /routes/api/auth/callback/+server.ts

export const GET: RequestHandler = async ({ url, cookies }) => {
const code = url.searchParams.get('code');
const state = url.searchParams.get('state');
const returnUrl = url.searchParams.get('returnUrl') || '/';

const csrfState = cookies.get('csrfState');

if (state !== csrfState || !code) {
return new Response('Invalid state', { status: 403 });
}

try {
const token = await getToken({ code });
const authUser = await verifyToken(token.id_token);
const user = await getOrCreateUser({ authId: authUser.sub, authUserProfile: authUser });

setAuthCookie(cookies, user);
cookies.delete('csrfState', { path: '/' });

return new Response(null, { status: 302, headers: { location: returnUrl } });
} catch (err) {
return new Response(`Failed to get token. Err: ${err}`, { status: 500 });
}
};


let cachedKey: string | undefined = undefined;

function getKey(header: JwtHeader, callback: SigningKeyCallback) {
client.getSigningKey(header.kid, function (err, key) {
if (err) {
callback(err);
}
if (cachedKey) {
callback(null, cachedKey);
} else {
const signingKey = key?.getPublicKey();
cachedKey = signingKey;
callback(null, signingKey);
}
});
}

export async function verifyToken<T>(token: string): Promise<T> {
return new Promise((resolve, reject) => {
jwt.verify(token, getKey, {}, (err, payload) => {
if (err) {
reject(err);
} else {
resolve(payload as T);
}
});
});
}

export async function getToken({ code } ) {
const resp = await fetch(`https://${AUTH0_DOMAIN}/oauth/token`, {
method: 'POST',
body: JSON.stringify({
code,
client_id: AUTH0_CLIENT_ID,
client_secret: AUTH0_CLIENT_SECRET,
redirect_uri: `${PUBLIC_BASE_URL}/api/auth/callback`,
grant_type: 'authorization_code'
}),
headers: {
'Content-Type': 'application/json'
}
});
return await resp.json();
}

export const setAuthCookie = (cookies: Cookies, user: User) => {
const cookieValue = jwt.sign(user, SESSION_SECRET);
cookies.set(COOKIE_NAME, cookieValue, {
httpOnly: true,
sameSite: 'lax',
maxAge: COOKIE_DURATION_SECONDS,
path: '/'
});
};

This callback function does several important things:

  1. It uses the query parameters to verify that the state matches the cookie value created during login.
  2. It uses the Auth code obtained from Auth0 to exchange it for a JWT token. This is done in getToken.
  3. Verifying the token returns the payload, which should contain the user details.
  4. At this point, we can either create the user in our backend or simply proceed if we don’t need to persist any user information.
  5. A session cookie is created using our own secret, with properties including httpOnly to ensure it’s not accessible in JavaScript.

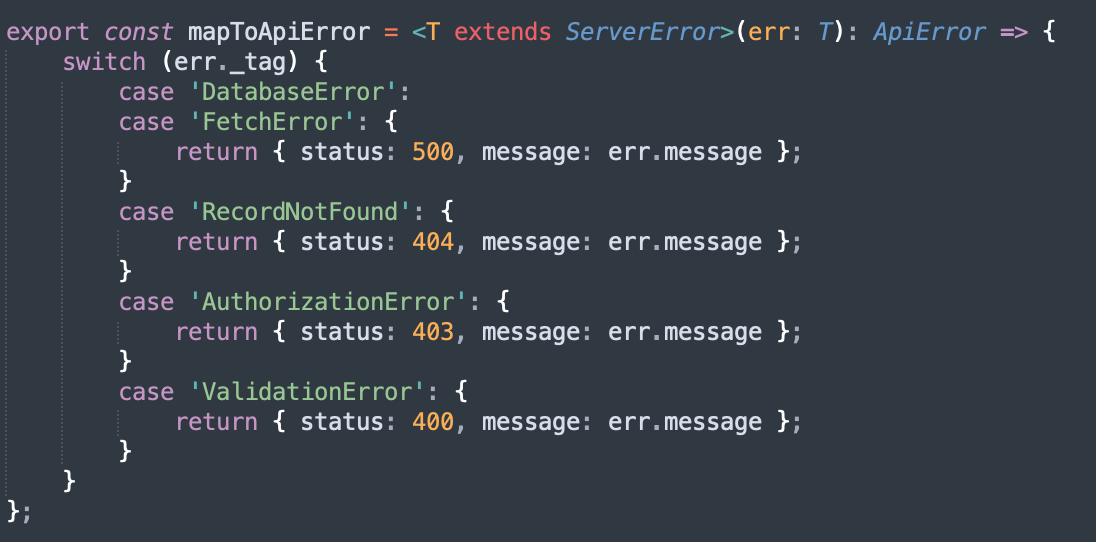
The environment variables are self-explanatory, and you can use third-party libraries like jsonwebtoken for verifying and signing JWTs.

Middleware: Extending session and protecting routes

The final piece is the middleware. We need to make use of SvelteKit hooks.server.ts.

export const handle = async ({ event, resolve }) => {

const cookie = event.cookies.get('session');
const url = new URL(event.request.url);

if (cookie) {
// Extend the cookie
const user = jwt.verify(cookie, SESSION_SECRET) as User;
setAuthCookie(event.cookies, user);
return await resolve(event);
}

if (!cookie && privateRoutes.has(url.pathname)) {
return new Response('LoginRequired', {
status: 302,
headers: { location: `/api/auth/login?returnUrl=${url.pathname}` }
});
}
return await resolve(event);
};

This method gets hit on every request. It decodes the contents of the session cookie, then sets a new cookie which extends it for the session duration, effectively creating a sliding window.

Your app should now be protected by Auth0!

Relevant links

Troubleshooting & Fixing the ‘Form Not Found’ Issue in Next.js with React Hook Form

Recently, our Next.js application started reporting that a handful of users were experiencing a ‘Not Found’ error after submitting a form. Upon reviewing session replays, it became clear that users were encountering a 404 error immediately after form submission, despite the page and form being fully rendered.

The problem

In our setup, we utilized react-hook-form within a client-side component to manage form submissions, which would then fetch data to the server. The form resided on the /citizenship page, with data submissions directed to /api/citizenship. However, an issue arose when the JavaScript handler for the form submission hadn’t yet loaded, leading users to unintentionally trigger a default GET request to a non-existent endpoint.

The root cause

When a user initially loads the HTML page, the form is visible, but the JavaScript onSubmit handler is absent until the Next.js page chunk fully loads. If a user submits the form before the handler is ready, the form defaults to a GET action, appending the selected value as a URL parameter (e.g., /citizenship?australianCitizen=yes), leading to a 404 since that endpoint does not exist.

Solution 1: Disabling the Submit Button

To address this, we decided to prevent form submission until the JavaScript was fully loaded. This was achieved by disabling the submit button initially and then enabling it via useEffect, ensuring synchronicity between the handler’s readiness and the button’s activation.

'use client';
import { useForm } from 'react-hook-form';
import { useState, useEffect } from 'react';

export const CitizenForm = () => {
const [isEnabled, setEnabled] = useState(false);
const form = useForm();

useEffect(() => {
setEnabled(true);
}, []);

const onSubmit = (data) => {
fetch('/api/citizenship', {
method: 'POST',
body: JSON.stringify(data),
});
};

return (
<form onSubmit={form.handleSubmit(onSubmit)}>
...
<button type="submit" disabled={!isEnabled}>Submit</button>
</form>
);
};

Solution 2: Leveraging Server Actions

Another potential solution, which I hadn’t explored at the time, involves utilizing server actions in Next.js. This approach allows for form submissions without relying on client-side JavaScript, offering a more streamlined and elegant solution.

Conclusion

Addressing the ‘Form Not Found’ issue in Next.js applications can be challenging but is crucial for maintaining a seamless user experience. By either disabling the submit button until the JavaScript loads or utilizing server actions, developers can ensure reliable form submissions in their applications.

Thank you for reading!

My Journey into Functional Programming with Kotlin and Svelte Kit

Embarking on my journey into functional programming, I initially delved into Kotlin. Concurrently, I was acquainting myself with Svelte Kit by crafting a simple Notes app. Although the allure of using both languages was enticing, fate led me to discover the fp-ts library for Node.js. This prompted me to rewrite some API endpoints, incorporating intriguing functional concepts, especially in error handling. This blog post serves as a comparative exploration of the imperative and functional styles, aiming to foster an appreciation for the evolutionary shift in approach.

Imperative style

Let’s start by dissecting a straightforward Svelte Typescript API endpoint that employs an imperative style for a GET request in a Notes app. For simplicity, the function assumes that user authentication has made the user ID available on the locals object.

The imperative style handles errors at the API level with different status codes for various scenarios: Note not found (404), user not found (403), unauthorized access (403), and unexpected errors (500).

Now imagine the other API methods like PATCH and DELETE. What would they look like and how much repetition would be required such as checking item existence and returning not found. One option would be creating shared services that return results that would then be mapped to an API result. At this point, something was telling me that this could be solved in better style using a function approach.

The functional style

Now, let’s delve into the functional approach:

The TE is a naming convention in fp-ts used for TaskEither which is basically akin of the Either type for asynchronous operations. Given we are in the world of node, we are almost always in a context of async and promises and that makes TaskEither container a very common tool.

  • We use the pipe method to start the chain
  • TE.Do initializes a sequence of operations.
  • TE.bind('user', () => getUser({ id: locals.user.id! })) retrieves the user with the given ID. The ! operator asserts that locals.user.id is not null or undefined. The bind method adds the user property to the TaskEither right container and is automatically available in the next method in the chain.
  • TE.bind('note', () => getNoteById({ id: params.id! })) retrieves the note with the given ID. Again, the ! operator asserts that params.id is not null or undefined.
  • TE.flatMap(({ user, note }) => isNoteOwner({ user, note })) checks if the retrieved user is the owner of the retrieved note. These two objects are made available because of the bind method.
  • TE.mapLeft(mapToApiError) maps any errors that occur during these operations to API errors.
  • Finally, the TE.match function is used to handle the result of the operations. If an error occurred, it returns a JSON response with the error message and status. If the operations were successful, it returns a JSON response with the note.

Separation of concerns

Digging deeper, the methods for data retrieval and validation return a Server Error in the left container. For example, the getUser method has the following signature:

The method is part of a repository layer and should not have any knowledge about API statuses like 404 or 500 but it should be able to return specific errors like database connection error, or a record not found error. In typescript we could take advantage of union types to handle this:

We can proceed to compose methods that operate on the business errors (ServerError) and when we’re ready it can then be mapped to an API error where it matters.

Conclusion

Although I’m only scratching the surface of functional programming, the moment I discovered TaskEither in fp-ts I knew it was enough to build something practical.

In my perspective, the functional approach yields cleaner, more predictable, and idiomatic code at the API level. It provides a systematic and structured way to handle errors, promoting separation of concerns and ensuring a more robust and maintainable codebase. Embracing functional programming in this context proves to be a transformative journey, enhancing the overall development experience.

Asserting Either in Vitest

Discovering the potential of the FP-TS library has been a rewarding experience, unlocking the power of functional programming. However, integrating it seamlessly can pose challenges. In my recent exploration of extending vitest matchers for the FP-TS ‘Either’ object, I encountered obstacles—particularly TypeScript’s reluctance to recognize custom matchers.

This post aims to share insights gained from overcoming these challenges, providing a guide for those grappling with TypeScript’s nuances or seeking to enhance their testing suite for FP-TS. Let’s dive in:

Ok. Let’s start with a super simple function that returns Either right when a number is positive or a Left with a message when the number is negative:

const isPositive = (n: number): E.Either<string, number> => {
return n >= 0 ? E.right(n) : E.left('Negative number');
};

How could we write a test for it?

import * as E from 'fp-ts/Either';
import { describe, it, expect } from 'vitest';

const isPositive = (n: number): E.Either<string, number> => {
return n >= 0 ? E.right(n) : E.left('Negative number');
};

describe('Either', () => {
it('isPositive', () => {
const result = isPositive(1);
expect(E.isRight(result)).toBe(true);
});
});

Using the isRight or isLeft utility from Either is great to assert the result type but what about the actual value (right or left object value)?

Given the Either is a union type in Typescript the only way to gain access to the Right or Left object without errors is by checkin the tag first:

	it('isPositive', () => {
const result = isPositive(1);
expect(E.isRight(result)).toBe(true);
if (E.isRight(result)) {
expect(result.right).toBe(1);
}
});

Having if statements in test code doesn’t feel very clean!

Wouldn’t it be nice if we could do both at once like this for left or right by calling a method like toBeRightStrictEqual which with is akin to the toStrictEquals?

	it('isPositive', () => {
const result = isPositive(1);
expect(result).toBeRightStrictEqual(1);
});

it('isNegative', () => {
const result = isPositive(-1);
expect(result).toBeLeftStrictEqual('Negative number');
});

Easy. Vitest has it covered with custom matchers. First we’ll need the setup file for vitest config that has the actual matchers:

import * as E from 'fp-ts/Either';
import * as vitest from 'vitest';

declare module 'vitest' {
interface CustomMatchers<R = unknown> {
toBeRightStrictEqual(expected: any): R;
}
}

vitest.expect.extend({
toBeRightStrictEqual(received: E.Either<unknown, unknown>, expected: unknown) {
return {
pass: E.isRight(received) && this.equals(received.right, expected),
message: () => `expected ${received} to be right ${expected}`
};
},
toBeLeftStrictEqual(received, expected) {
return {
pass: E.isLeft(received) && this.equals(received.left, expected),
message: () => `expected ${received} to be left ${expected}`
};
}
});

Finally. We then need the the declarations file for Typescript. This file should be able to live anywhere in your src directory. I named it vitest.extend.d.ts. The contents:

interface CustomMatchers<R = unknown> {
toBeRightStrictEqual(data: unknown): R;
toBeLeftStrictEqual(data: unknown): R;
}

declare module 'vitest' {
interface Assertion<T = any> extends CustomMatchers<T> {}
interface AsymmetricMatchersContaining extends CustomMatchers {}
}

export {};

Hope this helps others keep their code clean with some nicer Either assertions in Typescript!

Next Images in Storybook

The Image component is very much a key selling point for the Next framework. This is a must use for performance and user experience but a situation inevitably arises to use it in a custom component that we’d like to test out in Storybook. Doing this produces the following error.

Invalid src prop xxx on next/image hostname xxx is not configured under images in your next.config.js

When I ran to this problem initially, I found the original solution worked a treat. However, after a Nextjs 12.1.5 release, the issue came back and the original workaround lost the battle.

To simply remove this error in storybook, we just need to apply the `unoptimized` prop to the `next/image` component and voila! Storybook is back and working again.

<Image src="https://images.unsplash.com/photo-1534353436294-0dbd4bdac845?ixlib=rb-1.2.1&ixid=MnwxMjA3fDF8MHxwaG90by1wYWdlfHx8fGVufDB8fHx8&auto=format&fit=crop&w=1287&q=80" height={50} width={50} unoptimized />

But this isn’t how we want roll in production so we need to find a way to apply this prop to be false only in production code. A strategy I found useful here to use is the React Context. So we begin by creating the Provider and Context which has the unoptimized prop and set to false by default.

import React from 'react';

interface ImageOptions {
unoptimized: boolean;
}

interface ProviderProps extends ImageOptions {
children: React.ReactNode;
}

export const ImageOptimisationContext = React.createContext<ImageOptions>({ unoptimized: false });

// This provider is useful for allowing storybook to use a unoptimized: true
export const ImageOptimisationProvider = ({ children, unoptimized }: ProviderProps) => {
return <ImageOptimisationContext.Provider value={{ unoptimized }}>{children}</ImageOptimisationContext.Provider>;
};

The new custom wrapper Image component gets access to the React context and applies this property along with the rest of the next/image component. And is very similar to the solution applied previously.

import React from 'react';
import NextImage, { ImageProps } from 'next/image';

import { ImageOptimisationContext } from '@providers';

const Image = (props: ImageProps) => {
const { unoptimized } = React.useContext(ImageOptimisationContext);
return <NextImage {...props} unoptimized={unoptimized} />;
};

export default Image;

Wherever we use the next/image component, we replace it with our custom Image. Whip that find and replace if you like to live on the edge.

// From
import Image from 'next/image`;

// To
import Image from './components'

The final touch

A global storybook decorator would flip the prop to true and we should once again be rid of this issue, or at least for now.

./storybook/preview.js

import React from 'react';

import { ImageOptimisationProvider } from '../src/providers';

export const decorators = [
(Story) => (
<ImageOptimisationProvider unoptimized={true}>
<Story />
</ImageOptimisationProvider>
),
];

Happy story booking…

Query GraphQL in Nextjs and SSR Rehydration

There are a bunch of articles on how to setup Apollo GraphQL in Nextjs and a github repository from NextJs docs. Great starting points particularly for querying an API that is hosted externally to our App. The docs were not so generous however with describing how to accomplish server side rendering and performing query once on the server.

The data needs to make its way to the client on initial render and there are a couple of ways to achieve this. The method I made use of and describe here is to execute all the initial queries on the server page, extract the cache from the Apollo client, that will then be passed as a Page Prop to the Apollo Provider on the client.

User component with useQuery

Let’s say that we have the following component that makes use of `useQuery` from Apollo. Without cache hydration, the component render would run on the server and the client producing multiple queries to the backend.

import React from 'react';
import { useQuery } from '@apollo/client';

import { USER_PROFILE } from './queries';

const UserProfile = () => {
  const { data, loading } = useQuery(USER_PROFILE);
  
  if (loading) {
      return <div>loading...</div>;
   }

   return <div>Name: { data.user.name }</div>
}

Apollo provider

In Nextjs we need to setup the Apollo provider. We do that in the root `_app.tsx` component with the apolloCache passed down as a page prop:

export default function MyApp({ Component, pageProps, props }): JSX.Element {
  const apolloClient = useApollo({ initialCache: pageProps.apolloCache });
  const getLayout = Component.getLayout ?? getDefaultLayout;

  return (
      <ApolloProvider client={apolloClient}>
          {getLayout(<Component {...pageProps} />)}
      </ApolloProvider>
  );
}

Apollo client

The useApollo function is a custom hook that is responsible for creating the Apollo client that will be used for either server or browser. Function can be found here:

import { useMemo } from 'react';
import { ApolloClient, NormalizedCacheObject, InMemoryCache } from '@apollo/client';

interface Props {
  initialCache: NormalizedCacheObject;
}

let _cachedClient: ApolloClient<NormalizedCacheObject>;

const getOrCreateApolloClient = ({ initialCache }: Props) => {
  if (_cachedClient) {
    if (initialCache) {
      _cachedClient.cache.restore(initialCache);
    }

    return _cachedClient;
  }

  _cachedClient = new ApolloClient<NormalizedCacheObject>({
    cache: new InMemoryCache(),
    credentials: 'same-origin',
    uri: '/api/graphql',
  });

  _cachedClient.cache.restore(initialCache);
  return _cachedClient;
};

export default function useApollo({ initialCache }: Props) {
  const client = useMemo(() => getOrCreateApolloClient({ initialCache }), [initialCache]);

  return client;
}

The uri `/api/graphql` is the relative url configured for GraphQL server running within the same App.

NextJS Page

Here’s NextJS page app with getServerSideProps method preparing the apolloCache:


const UserProfilePage = ({ errorCode, ...restProps }) => {
  if (errorCode) {
    return <Error statusCode={errorCode} />;
  }

  return <UserProfile {...restProps} />;
};

export const getServerSideProps: GetServerSideProps<UserProfilePageProps> = async (context) => {
  const apolloClient = await createServerApolloClient({ context });

  await apolloClient.query({
    query: USER_PROFILE,
    variables: {
      username,
    },
  });

  const apolloCache = apolloClient.cache.extract();

  return {
    props: {
      apolloCache,
    },
  };
};

export default UserProfilePage;

Apollo client for the server

The call to creating the Apollo client on the server is important for querying database resources. Since the schema and methods are located locally we can make use of the makeExecutableSchema method from graphQL tools and pass in the schema and resolvers.

This was the missing piece for me when searching for solutions online.

export async function createServerApolloClient({
  context
}: {
  context: GetServerSidePropsContext;
}): Promise<ApolloClient<NormalizedCacheObject>> {

  const schema = makeExecutableSchema({ typeDefs, resolvers });

  return new ApolloClient<NormalizedCacheObject>({
    link: new SchemaLink({
      schema,
      context: (): ApiContext => {
        return { db, config };
      },
    }),
    ssrMode: true,
    cache: new InMemoryCache(),
  });
}

Other resources including the article from Kellen Mace is really useful for querying remote API’s externally to our Next App.

Hopefully this article can help you and fill the gap on querying from the same server.

Next getServerSideProps High Order function in Typescript

Have you needed to reuse some code for Next pages in particular within the server side function getServerSideProps when preparing the props for a page?

Some common and practical examples include fetching a user and authorising them. But for simplicity sake, we’ll use logging latency. Here we have a simple page that requires Props to be created based on an Api call. We want to capture the latency by capturing the current timestamp, execute code for assembling the props and then log the latency at the end.

import axios from 'axios';
import logger from './logger';

interface PageProps {
  hello: string;
}

export default function MyPage<PageProps>({hello}) {
  return <h1>{hello}</h1>
}

export const getServerSideProps = async (ctx: GetServerSidePropsContext): Promise<GetServerSidePropsResult<P>> => {
  const startTime = Date.now();

  const apiResult = await axios.fetch('/api/hello');

  const finish = Date.now() - start;
  logger.info({ message: 'httpLog', latencyMs: finish });

  return {
    props: {
      hello: apiResult.data,
    }
  }
}

We may want to repeat our logging code in other pages. Copy pasting it would be breaking our DRY principles and that would make a lot of people sad.

Instead we can wrap our function in a High Order Function. In React this concept is very similar to HOC’s and in Express think of this as middleware.

For good measure, here’s an example with Typescript!

import { GetServerSideProps, GetServerSidePropsContext, GetServerSidePropsResult } from 'next';

import logger from './logger';

export const withLogging = <P extends { [key: string]: any } = { [key: string]: any }>(gssp: GetServerSideProps<P>) => {
  return async (ctx: GetServerSidePropsContext): Promise<GetServerSidePropsResult<P>> => {
    const startTime = Date.now();
    const result = await gssp(ctx);
    const latency = Date.now() - startTime;

    logger.info({
      latency,
      msg: 'HttpLog',
      url: ctx.resolvedUrl,
    });

    return result;
  };
};

So our re-written page function would look like:

export const getServerSideProps = withLogging(async (ctx: GetServerSidePropsContext): Promise<GetServerSidePropsResult<P>> => {

  const apiResult = await axios.fetch('/api/hello');

  return {
    props: {
      hello: apiResult.data,
    }
  }
})

Auth0 NextJS library uses a similar concept but much harder to read/understand code. https://github.com/auth0/nextjs-auth0/blob/main/src/helpers/with-page-auth-required.ts#L98

So this was my attempt to simplify it for others and provide a working example.

Happy coding

Epic react course key takeaways – useState lazy load and react hook flow

About a month ago I’ve started to slowly chip away at Kent C Dodds Epic React course, that was gratefully funded by Open Universities.

Although I’ve been building apps for production in React for a few years, I never really felt confident that I understood all the optimisations and craved to learn some useful patterns.

It was my intention to document some of the learnings here, so that I can refer back to them (if any), and after doing a few modules I’m greatly to share some things. Some of them may be broken up in different posts to prevent an overly large post.

Calling useState with a function for Lazy Loading

After visiting the React documentation, it was confirmed that this was not mentioned anywhere. Not sure why but it could be pretty useful, in particular to a situation outlined below. Every time we invoke useState, we can supply a function instead of a value. This function is the lazy initialiser and can be used for situations where setting initial state is a little more expensive than just setting a hardcoded value. One example used in the course was reading from local storage and deserializing an object for a nifty little useLocalStorage hook:

function useLocalStorage(
  key,
  defaultValue = '',
  {serialize = JSON.stringify, deserialize = JSON.parse} = {},
) {
  // check out the function that we pass in to useState!
  const [value, setValue] = React.useState(() => {
    const localStorageValue = window.localStorage.getItem(key)
    if (localStorageValue) {
      return deserialize(localStorageValue)
    }

    return typeof defaultValue === 'function' ? defaultValue() : defaultValue
  })

  const prevKeyRef = React.useRef(key)

  React.useEffect(() => {
    const prevKey = prevKeyRef.current
    if (prevKey !== key) {
      window.localStorage.removeItem(prevKey)
    }

    prevKeyRef.current = key
    window.localStorage.setItem(key, serialize(value))
  }, [key, value, serialize])

  return [value, setValue]
}

React Hook flow Diagram

Will be back for more next time.

Auth0 and Apollo GraphQL handling token expiry

Seems like there is an abundance of articles out there to wire up Auth0 SPA library to a react with Apollo GraphQL application but none of them seem to explain how to handle the token expiry scenario (not easily anyway). Majority of the articles I found firstly didn’t involve Auth0 and secondly they are based on 401 responses from a server in the GraphQL ErrorLink middleware followed by a complex fromPromise calls to obtain a new token and then retry the original calls.

After a few attempts at this pattern, I had no luck. So I decided to change the strategy from handling 401 server responses, to instead check the expiry date on then token, so if expired call getTokenSilently to get a new token. Simple.

Basic setup

This youtube video is a really good example to follow along to setup the basic auth0 react Provider. It leaves you with only having to figure out which configuration values to apply in your application.

Backend

The tech stack used here as an example uses a Koa server with a route /api/graphql that is requires an auth token. The middleware auth can be applied now by using the koa-jwt package along with jwks-rsa. The youtube video above provides a walkthrough on setting up authorization on graphQL operations. This does definitely make it more flexible.

Looking at the middleware code:

import { Context, Next } from 'koa';
import jwt from 'koa-jwt';
import jwtrsa from 'jwks-rsa';


export default function ({ auth: { domain, audience } }) {
  return jwt({
    secret: jwtrsa.koaJwtSecret({
      jwksUri: `https://${domain}/.well-known/jwks.json`,
      cache: true,
      cacheMaxEntries: 5,
    }),
    audience: audience,
    issuer: `https://${domain}/`,
    algorithms: ['RS256'],
  }).unless({ path: [/^\/api\/(playground)/] });
}

You may notice that the Playground path is excluded. Now, in the koa app setup we just add the required middleware:

import Koa from 'koa';
import config from './config';
import authMiddleware from './authMiddleware';
import { graphQLServer, graphQLPlayground } from './graphql';

const app = new Koa();
app.use(mount('/api', authMiddleware(config)));

// setup 
graphQLServer.applyMiddleware({ app, path: '/api/graphql' });
graphQLPlayground.applyMiddleware({ app, path: '/api/playground' });

// start it up
app.listen(4000);

Frontend

The grunt of the work to handle this situation happens in the Apollo graphQL client middleware. But I’ll start providing the code examples from the GraphQL provider:

import createClient from './createClient';

const GraphQLProvider = ({ children }: Props) => {
  const auth = useAuth()!;

  const { getTokenSilently } = auth;

  const client = createClient({ getTokenSilently});

  return <ApolloProvider client={client}>{children}</ApolloProvider>;
};

export default GraphQLProvider;

The createClient method returns a new GraphQL client. The key part of this snippet is the order in which the links are created. The auth0Link comes first and is responsible to always ensure that there is a valid token. The authLink is only responsible for attaching the token in to the http headers.

export default function createClient({ getTokenSilently }) {
  const auth0Link = createAuth0Link({ getTokenSilently });
  const errorLink = ...;
  const webSocketLink = ...;

  const splitLink = split(
    ({ query }) => {
      const definition = getMainDefinition(query);
      return definition.kind === 'OperationDefinition' && definition.operation === 'subscription';
    },
    webSocketLink,
    httpLink,
  );

  const authLink = setContext((_, { headers, auth0Token }) => ({
    headers: {
      ...headers,
      ...(auth0Token ? { Authorization: `Bearer ${auth0Token}` } : {}),
    },
  }));

  const link = from([auth0Link, errorLink, authLink, splitLink]);
  const cache = createInMemoryCache();
  const apolloClient = new ApolloClient<NormalizedCacheObject>({
    link,
    cache,
  });

  return apolloClient;
}

So let’s have a look at the auth0Link:

import jwtDecode, { JwtPayload } from 'jwt-decode';

let cachedToken: string;
let tokenExpiry: Date;

export const getAuthToken = async ({ getTokenSilently }) => {
  if (cachedToken && tokenExpiry > new Date()) {
    return cachedToken;
  }

  console.log('Requesting new token. Old one expired');
  const newToken = await getTokenSilently();
  cachedToken = newToken;
  const { exp } = jwtDecode<JwtPayload>(newToken);
  tokenExpiry = new Date(exp * 1000);
  return cachedToken;
};

As mentioned at the start of this post, the getTokenSilently is the method we need to invoke from Auth0 to get a new jwt token. But we only want to get a new one if the cached one has expired. And this is quite simple by using the jwt-decode library and storing the token expiry date when we receive a new one.

Happy coding…

Ant Design Async Input Validation

Recently I came across the scenario where I needed to validate phone number or email are unique. So I had to use some server side validation on a form input.

There’s a few ways that this can be solved.

Doing the validation in the API on form submit is definitely one of them. This logic should definitely remain server side in any case, since we don’t want to completely rely on protecting our system only on our clients. I’ve even gone ahead and ensured that the Database Table has a unique only value for phone and email.

But how can we improve the user experience, so they don’t have to wait to click a button and only then find out? Well, a nice way to do it is, is while the user typing or the input is validating.

Ant Design docs could be a little friendlier, but I actually found the custom validator supports the async (or server side) validation out of the box. Check out this really simple PhoneInput component with Apollo GraphQL as a nice touch 🙂

import React from 'react';
import { useMutation } from '@apollo/client';
import gql from 'graphql-tag';
import { Input, Form } from 'antd';
import { PhoneOutlined } from '@ant-design/icons';

interface Props {
  required?: boolean;
  validateUnique?: boolean;
}

interface ValidateResponse {
  validatePhone: boolean;
}

interface ValidateRequest {
  phoneNumber: string;
  ignoreMyPhone: boolean;
}

const VALIDATE_PHONE = gql`
  mutation VerifyPhone($phoneNumber: String!) {
    validatePhone(phoneNumber: $phoneNumber)
  }
`;

const PhoneInput = ({ required = true, validateUnique = true }: Props) => {
  const [validatePhone] = useMutation<ValidateResponse, ValidateRequest>(VALIDATE_PHONE);

  const pattern = /^!*([0-9]!*){10,10}$/g;

  const handlePhoneValidation = async (_, phoneNumber: string): Promise<boolean> => {
    const resp = await validatePhone({ variables: { phoneNumber, ignoreMyPhone } });

    if (!resp.data.validatePhone) {
      return Promise.reject(resp.data.validatePhone);
    }
    return Promise.resolve(true);
  };

  return (
    <Form.Item
      name="phone"
      label="Phone"
      validateFirst={true}
      validateTrigger="onBlur"
      rules={[
        { required, message: 'Phone is required' },
        { pattern, message: 'Phone must be in the right format' },
        ...[
          validateUnique
            ? { validator: handlePhoneValidation, message: `This number is already associated to an account` }
            : null,
        ],
      ]}
      hasFeedback
    >
      <Input prefix={<PhoneOutlined />} size="large" placeholder="04xxxxxxxx" />
    </Form.Item>
  );
};

export default PhoneInput;

Method handlePhoneValidation is invoked by the custom validator defined in the rules array of the field. It’s as simple as declaring the method as async. We simple invoke the API method, and then we could either throw an error, or a rejected promise.

Another thing to note. The prop validateFirst is set to true. I don’t really like this name, because it feels it needs explanation. Basically, it will only fire one validation at a time. In this instance, there is a pattern validator which is better to fire first before hitting our API. If something isn’t working locally, it wouldn’t make sense to load the server with an invalid field. Parallel validation sounds good, but not so much in this situation.

The prop validateTrigger being set to onBlur, is another not-required property but in this instance I find useful because it will only fire when the focus leaves the element. The default Ant Design validation is on every keystroke.

How about the server side? The GraphQL resolver should be quite simple. Try and find a user by phone and return the appropriate response.

interface Args {
  phoneNumber: string;
  ignoreMyPhone: boolean;
}

const validatePhone = async (_, args: Args, { dataSources, user }: ApiContext): Promise<boolean> => {
  const phoneNumber = userService.convertPhoneTo164(args.phoneNumber);
  if (!phoneNumber) {
    throw new UserInputError(Errors.INVALID_PHONE);
  }


  const { userRepository } = dataSources;
  const anotherUser = await userRepository.findByPhone(phoneNumber);

  return !anotherUser;
};

export default validatePhone;

Happy validating!